http://neosmart.net/wiki/display/EBCD/Recovering+the+Windows+Bootloader+from+the+DVD
If your Windows Vista or Windows 7 bootloader has been damaged or corrupt in some way, you’ll have to get it reset before you can use EasyBCD to configure a dual-boot.
Use this section only if you cannot boot into any version of Microsoft Windows. If you can boot into Windows, we highly recommend using our Recovering the Windows Bootloader with EasyBCD guide instead!
Booting from the Windows Installation DVD
 |
Stop! Are you using an HP or Dell? Don’t have a Windows Setup DVD?
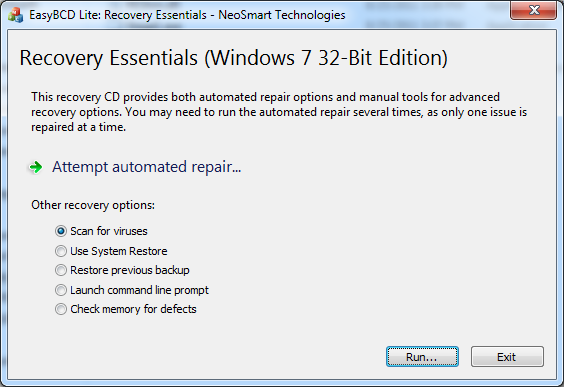
Many so-called “professional” computer vendors are too cheap to include a Windows Vista or Windows 7 DVD with your PC. If you’re unlucky enough to get a recovery partition or a recovery DVD without a stock Windows setup DVD too, you have no way of accessing the repair center.As a service to our users, we provide a repair CD that provides access to the functionality discussed below, which you can download from our site. There is however a handling and processing fee for the download.
IMPORTANT: You cannot use this disk to install or reinstall Vista/7. We repeat: these recovery CDs do not contain any installation files! |
Put your Windows setup DVD or your System Repair Disc in the drive and restart your PC. Assuming you’ve properly configured your BIOS to boot from CDs/DVDs before hard drives (or you can press F12 if your PC supports it to boot from the CD), you should get a prompt asking you to “Press any key to boot from the CD/DVD…”
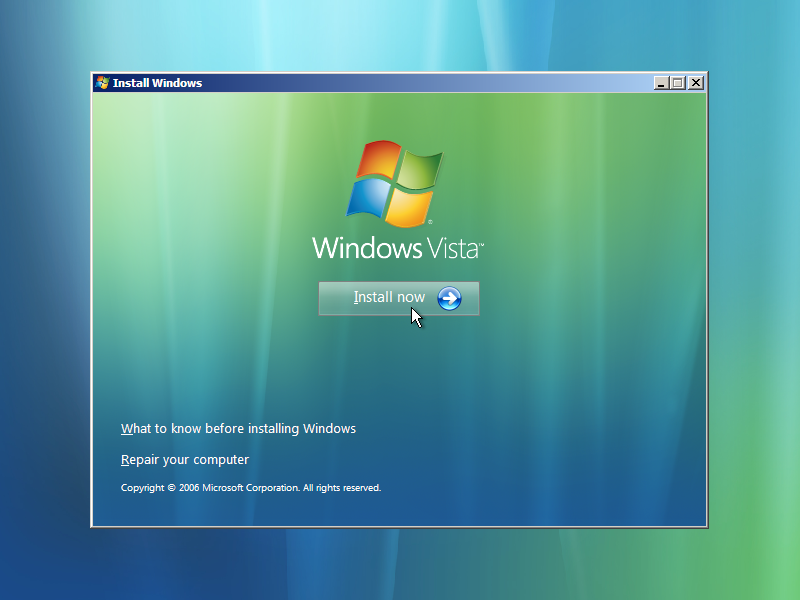
Press a key, and the CD will begin to load. If you are using your Windows Installation CD, you’ll see a dialog asking you want to Install Now, or in the lower left corner, an option to “Repair your Computer,” which you’ll want to click. If you’re using our recovery CDs, just go on to the next section.

Select “Repair your computer” to continue.
After selecting your language, the recovery CD will scan for operating systems on your drive. Select operating system from the list displayed on the screen, then press next to continue.
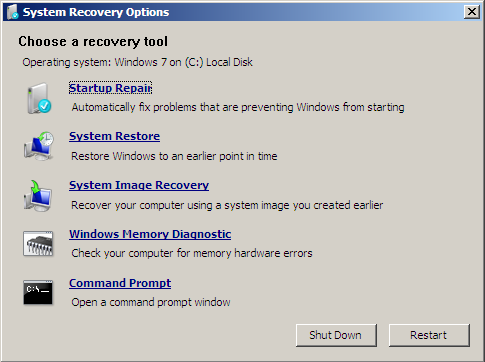
You’ll see a welcome screen like this one:
Option One: Automated Repair
Clicking on the “Attempt automated repair…” text with the green arrow at the top of the screen will cause the recovery CD to attempt to repair your bootloader and boot menu. Assuming your boot files have not been too badly corrupted, this step should conclude with a “Issues resolved” message and prompt you to reboot. It could literally be this easy to fix your PC.
If the automated repair feature is not successful, or after rebooting you discover that your PC still does not work, read on.
Note: The automated repair only fixes one thing at a time, and you might need several things fixed (MBR, bootmgr, boot folder). So boot from the recovery CD again and repeat the whole process. If it’s still not working after repeating the automated repair 3 times, carry on with the following manual steps:
Option Two: Manually Repairing the Windows Bootloader
Desperate times call for desperate measures. This time, we’re going to select the “Launch command prompt” option and try to manually tell the Recovery Console what needs to be fixed. Chances are, this is as far as you’ll have to go; hopefully it’ll get the job done.
Go ahead and select “Command Prompt” from that list, and you should get a window not dis-similar to the one you see when run cmd.exe from Windows.
Let’s start by telling the recovery console to fix our MBR and bootsectors:
bootrec.exe /fixmbr
bootsect.exe /nt60 all /force
Then ask it (nicely!) to try and rebuild your BCD data from scratch:
 |
You will need to replace C:\ in the example below with the letter for your boot drive! It’s most likely C:, but it could be something else! |
attrib -h -s C:\boot\BCD

del C:\boot\BCD
bootrec.exe /rebuildbcd
If you’re lucky, this’ll work and you’ll see a message telling you everything went OK.
Reboot your PC and try booting back into Windows to see if it worked. Don’t forget to remove your Windows Vista DVD or Recovery DVD from the drive, or you’ll end back in the repair center!
If your PC still doesn’t boot, read on to Option Three for a more powerful recovery option.
Option Three: Nuclear Holocaust
Back at the main page of the recovery center, go ahead and select “Command Prompt” yet again from that list.
The first order of business is to make sure the MBR and bootsector contain the right references to the Windows bootloader:
bootrec.exe /fixmbr
bootsect.exe /nt60 all /force
Now we get rid of the old BCD registry, and create a new one instead.
Note: We’re assuming that the boot drive is drive C: below. If your computer is configured differently, be sure to use the appropriate drive letter here instead.
attrib -h -s C:\boot\BCD

del C:\boot\BCD
bcdedit /createstore c:\boot\bcd.temp
bcdedit.exe /store c:\boot\bcd.temp /create {bootmgr} /d "Windows Boot Manager"
bcdedit.exe /import c:\boot\bcd.temp
bcdedit.exe /set {bootmgr} device partition=C:
bcdedit.exe /timeout 10
attrib -h -s C:\boot\bcd.temp
del c:\boot\bcd.temp
Now we have a clean, working Vista bootloader. But we need to add a Windows entry to it:
bcdedit.exe /create /d "Microsoft Windows" /application osloader
bcdedit.exe should return a message with a GUID for the newly-created entry, something like this:
The entry {c0dfc4fa-cb21-11dc-81bf-005056c00008} was successfully created.
You’ll need to use the value that bcdedit.exe returned for you below, along with the drive letter for the drive that Windows is installed to:
Again, make sure to replace C: with whatever the correct drive is for your Windows Vista/7 installation.
bcdedit.exe /set {c0dfc4fa-cb21-11dc-81bf-005056c00008} device partition=C:
bcdedit.exe /set {c0dfc4fa-cb21-11dc-81bf-005056c00008} osdevice partition=C:
bcdedit.exe /set {c0dfc4fa-cb21-11dc-81bf-005056c00008} path \Windows\system32\winload.exe
bcdedit.exe /set {c0dfc4fa-cb21-11dc-81bf-005056c00008} systemroot \Windows
And, last of all, tell the bootmgr bootloader to list the new entry or else it’ll remain hidden:
bcdedit.exe /displayorder {c0dfc4fa-cb21-11dc-81bf-005056c00008}
Now your bootloader has been completely removed and rebuilt from scratch. If you got this to work, feel free to consider yourself one of the finest graduates of the NeoSmart Technologies Institute of BCD Learning.
At this point, you have a clean, untouched, and (hopefully) fully-working bootloader with one entry for Windows. Go ahead and reboot your PC, get back into Windows, and use EasyBCD to further tweak the bootloader to your heart’s content. We advise backing up the BCD registry immediately with EasyBCD before making any changes.